
How to Remove Sew-In Hair Extensions: Westminster, CO
You’ve loved the flawless volume of your sew-in extensions, but as your natural hair grows out, it’s time for the wefts to come down.
However, your extension journey doesn't end there. How you handle the removal process is just as critical as the initial installation—in fact, rushing this step is the number one cause of extension-related hair damage.
For women in Westminster, CO, protecting your natural hair in our dry climate is a top priority. Whether you’re preparing for a fresh set of luxury wefts or giving your scalp a well-deserved break, this guide covers everything you need to know about safely removing a sew-in, the risks of DIY, expected costs, and why professional removal is always the gold standard.
Why Removing Sew-Ins Can Be Risky
Before we dive into the exact methods of how to take out a sew in, it is crucial to understand the anatomy of your extensions and why the removal phase is often referred to as the "danger zone."
A sew-in extension method—such as hand-tied wefts or volume wefts—consists of three main components: your natural hair, the foundation (which is either a hidden braided row or a row of silicone-lined microbeads), and the extension weft itself, which is secured to the foundation using specialized nylon or cotton thread.
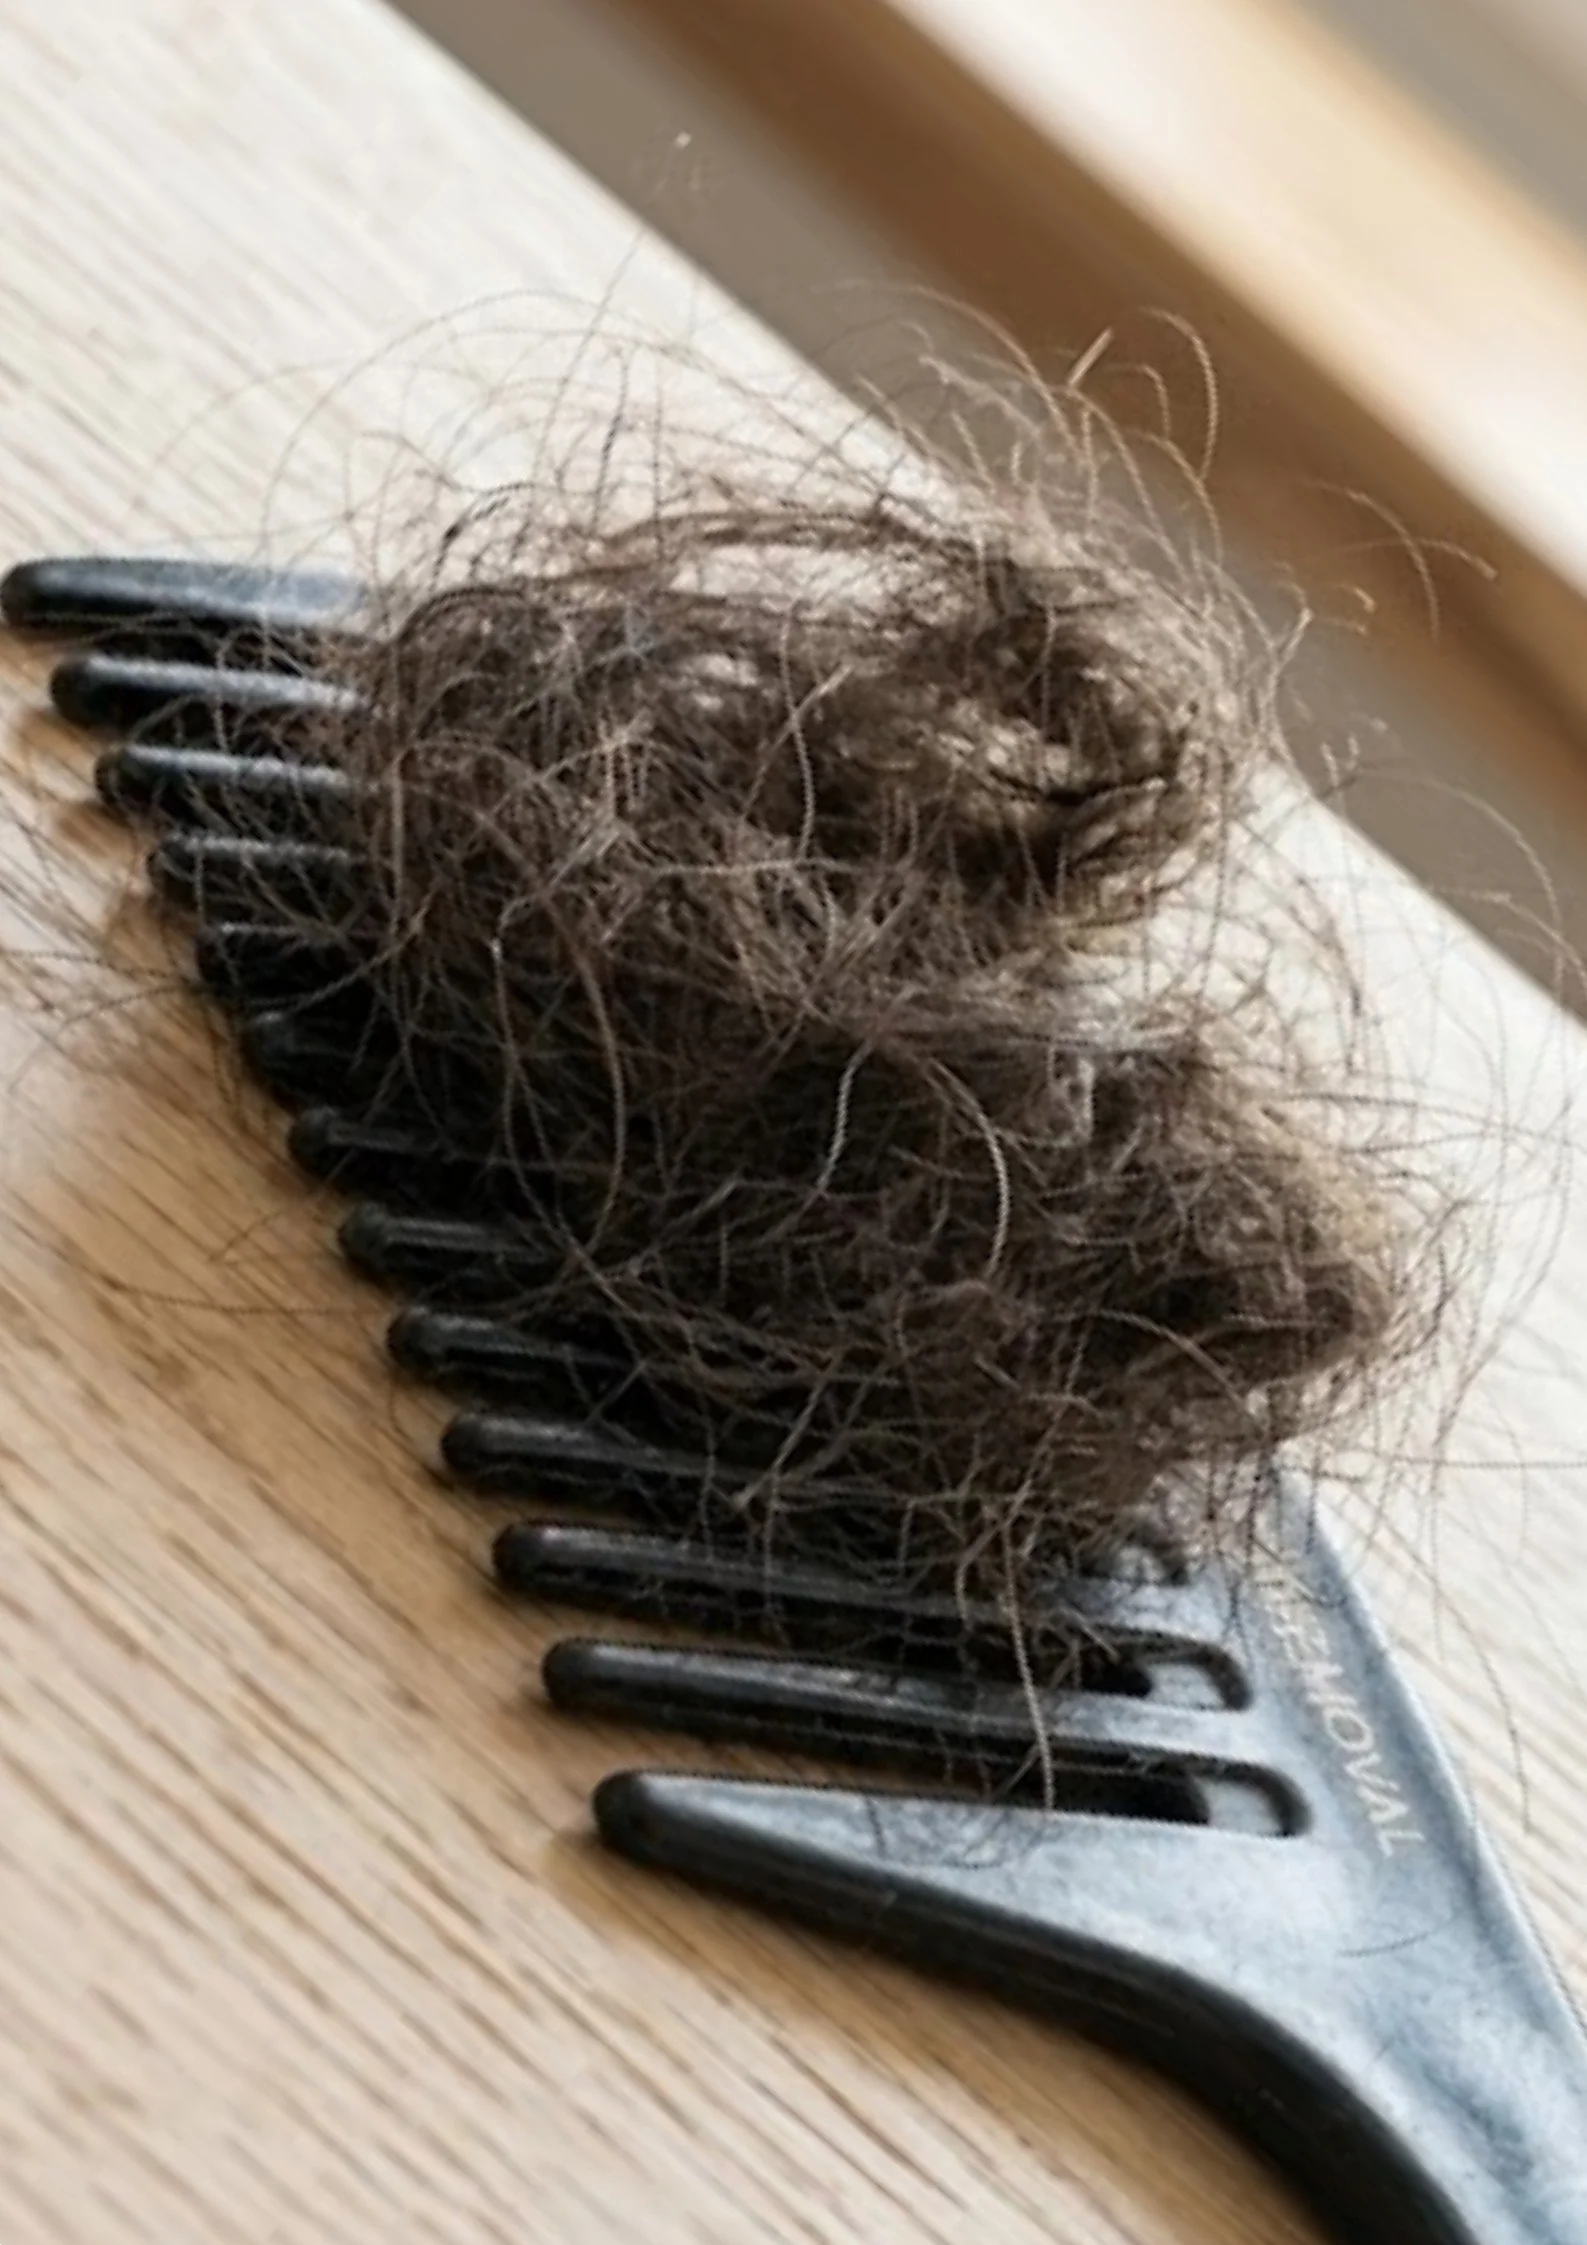
The biggest risk during removal is not necessarily the thread; it is the natural shedding process. Did you know that the average person naturally sheds between 50 to 100 hairs every single day? When you are wearing a sew-in, those naturally shed hairs have nowhere to go. They become trapped inside the braided or beaded foundation. Over the course of 8 to 10 weeks, that shed hair mixes with your natural scalp oils, dead skin cells, and product residue.
If you do not carefully isolate the thread, or if you attempt to aggressively brush through this trapped hair before properly separating it, those shed hairs will instantly lock together, creating a severe, dense mat or "dreadlock" at the root. Furthermore, using the wrong tools to snip the thread can easily result in you accidentally cutting a chunk of your own natural hair or permanently destroying a thousand-dollar set of luxury wefts.

How to Remove Sew In Hair Extensions at Home (Step-by-Step)
If you are in a pinch and absolutely must learn how to take out sew in extensions at home, you must proceed with extreme caution, patience, and the right lighting. Do not attempt this if you are in a rush.
Step 1: Gather the Right Tools
Do not reach for the kitchen scissors. To safely remove a sew-in, you need precision. Gather the following items before you begin:
A seam ripper or specialized hair extension micro-scissors.
A rat-tail comb for sectioning.
Large hair clips to hold your natural hair out of the way.
A high-quality, wide-tooth comb or a loop extension brush.
A liquid detangling spray or lightweight hair oil.
Hair extension pliers (if your foundation uses microbeads).
Step 2: Isolate the Row and Section the Hair
Start at the top row of your extensions and work your way down. Use your rat-tail comb to create a clean part just above the weft. Clip all of your natural hair up and out of the way so that the entire row of extensions is fully exposed. You should clearly be able to see the thread looping around the top of the weft.
Step 3: Carefully Snip the Thread
This is the most delicate part of learning how to remove sew in hair extensions. Using your micro-scissors or seam ripper, gently slide the tip under only the thread. Do not point the scissors toward your scalp, and do not grab the actual spine of the weft. Snip the thread at every other loop across the entire row. Once the thread is cut in several places, use your fingers to gently pull the thread out and unravel it.
Step 4: Remove the Weft and the Foundation
As the thread is completely removed, the weft will simply slide off the foundation. Set the expensive weft aside safely. Now, you are left with the foundation.
If you have a braided foundation: Carefully unbraid the cornrow using the tail of your comb.
If you have a beaded foundation: Use hair extension pliers to gently squeeze the microbead in the opposite direction it was clamped. This will open the bead into a perfect circle, allowing you to slide it effortlessly down and off your natural hair.
Step 5: The Crucial Detangling Phase
Do not skip this step, and absolutely do not get your hair wet yet. Once the foundation is removed, you will feel a clump of hair near your root. This is the 8 weeks of trapped, naturally shed hair mentioned earlier. Spray a generous amount of detangling spray or apply a lightweight oil directly to this clump. Using your wide-tooth comb, hold your hair tightly at the root (to prevent pulling your scalp) and start gently picking apart the clump from the bottom up. You will see a lot of hair fall out during this step. Do not panic; this is normal shedding that has been trapped. Keep combing until the hair is 100% smooth and tangle-free.
How to Take Out a Sew In Safely
While the DIY steps above sound straightforward, the reality of performing them on the back of your own head is incredibly difficult. You are working with sharp tools in an area you cannot clearly see, relying entirely on mirrors and touch.
When you opt for professional removal, you are paying for peace of mind and the preservation of your natural hair. A certified stylist has the proper angles, professional-grade lighting, and the exact tools required to dismantle the sew-in methodical. More importantly, they have the professional products and techniques necessary to safely slip out the dreaded root-mats without causing breakage to your healthy strands.
If you are unsure of your ability to safely execute the removal, we highly advise booking an appointment with a professional hair extensions salon. A trained stylist will ensure that not a single strand of your natural hair is compromised during the takedown process, leaving your hair just as healthy as the day the extensions were installed.
Expert Opinion: The Hidden Risks of Takedowns

Hair Extension Removal Cost in Westminster, CO
One of the main reasons clients attempt to take down their extensions at home is the perceived cost of a salon visit. If you are researching hair extension removal cost, transparency is key.
The price for professional removal varies based on a few factors:
The Method Used: A simple beaded weft is faster to remove than a complex, multi-row braided sew-in.
The Condition of the Hair: If you have severe matting because you went 12 weeks without a move-up, the stylist will have to spend significantly more time carefully detangling your roots.
Pricing Structure: Some salons charge a flat fee per row, while others charge an hourly rate for removal.
In the Westminster and greater Denver, Colorado area, you can generally expect the removal cost to range between $50 to $150.
When weighing this cost, consider it an investment in prevention. Attempting a DIY removal to save $75, only to accidentally cut a chunk of your own hair or ruin a $1,000 set of hand-tied wefts, is a risk that simply isn't worth taking. The professional fee covers the stylist's time, the use of salon-grade detanglers, and a thorough, clarifying wash that preps your hair for its next phase.
Recovering Your Natural Hair After Removal
Once your sew-in is safely removed, your natural scalp and hair need a little extra TLC to bounce back. Your hair has been carrying extra weight, and your scalp has been partially obscured from thorough cleansing for months.
1. The Clarifying Wash: Your first wash after removal should be with a high-quality clarifying shampoo. This will deeply cleanse the scalp, removing any lingering product buildup, dead skin cells, and excess oils that accumulated beneath the weft foundation.
2. Deep Conditioning and Hydration: Because the clarifying shampoo opens the hair cuticle, you must follow up with an intensive moisture mask. Focus the mask on your mid-lengths and ends to restore elasticity and shine.
3. Scalp Stimulation: For the first few days post-removal, dedicate 5 to 10 minutes to a thorough scalp massage. Use a nourishing scalp serum or simply the pads of your fingertips. This stimulates blood flow to the hair follicles, encouraging fresh, strong hair growth and relieving any minor tension your scalp may have been holding onto.
Finding the Best Sew In Removal Near Me
The takedown process is a highly technical service that requires immense patience and an in-depth understanding of extension mechanics. If you are preparing to have your wefts removed, do not simply walk into the nearest budget salon. You need an expert.
When searching for sew in removal near me, look for dedicated extension specialists who are certified in the specific method you are currently wearing (such as Invisible Bead Extensions, Natural Beaded Rows, or traditional braided sew-ins). A certified specialist understands exactly how the tension was applied and knows the safest, gentlest way to release it.
If you are searching for the safest, most luxurious hair extensions near me in the northern Denver metro area, our specialists at The Glam House Westminster location are rigorously trained in damage-free takedowns. We treat your natural hair with the utmost respect, ensuring a smooth, painless transition whether you are taking a break or preparing for a fresh installation.
Protect Your Hair: Book Your Removal at The Glam House
Your natural hair is your ultimate crown, and it deserves to be treated with absolute precision and care. While learning how to remove sew-in extensions at home is helpful in an absolute emergency, the risk of matting, breakage, and irreversible damage is incredibly high.
Do not gamble with your hair's health. Let the experts handle the heavy lifting. If you are in the Westminster, Colorado area and need a safe, professional takedown, we are here to help. At The Glam House, our certified extension specialists will carefully dismantle your sew-in, flawlessly detangle your natural locks, and provide a deeply restorative wash to bring your scalp back to life.
Ready to safely transition to your next hair goal? Book your professional extension removal at our Westminster location today and experience the peace of mind that comes with luxury hair care.
Frequently Asked Questions
-
Yes, it is entirely normal and expected. Humans shed 50 to 100 hairs every day. Over a 10-week extension install, that equals up to 7,000 shed hairs that have been trapped in the thread and beads. When the extensions are removed and you brush your hair, all of that trapped hair comes out at once. It can look scary, but it is not breakage; it is just natural shedding.
-
Absolutely not. Washing your hair before the thread is removed and the shed hair is entirely combed out will cause the loose hairs to instantly shrink, knot, and mat together. Water acts as a binding agent for shed hair. Always remove the extensions and detangle completely on 100% dry hair before stepping into the shower.
-
If your hair is in good condition and there is minimal matting, a professional can remove a full two-row sew-in in about 30 to 45 minutes. If there is severe tangling or if you are attempting it yourself at home, it can take anywhere from 1 to 3 hours to do it safely.
Read More


